Sponsored by
This article covers the basic equipment, information, and skills required to successfully engage in practical long-range rifle shooting. Keep in mind that this is an article and not real training, and there is no substitute for getting out there and learning from each shot.
It is divided into three sections. The first is about the rifle and gear. The second discusses trajectory and optics selection in depth. The third explains how to put everything together to make hits on targets in the field.
PART I: THE RIFLE & GEAR - priorities, cost, calibers, rifles, ammunition, scopes, range-finders, ancillary gear, spotting, data
PART II: OPTICS - ballistics, elevation, wind, lead, data cards, dialing elevation, parallax, first focal plane vs. second focal plane, elevation adjustment & travel, clicks, zero-stop, single- vs. multi-turn knobs, bullet-drop compensators (BDC), tube diameter, reticle features, MIL vs. MOA, reticle illumination, brightness, magnification, objective size, specific recommendations
PART III: SHOOTING - zeroing, finding a range, targets and placement, packing up, arrival, target location, positioning, making scope adjustments, engagement, follow-up, shooter/spotter communication, efficiency
Applications include but are not limited to: very small targets 1/4"-1" at 100 to 200 yards, so-called "cold bore" shots, arbitrary unknown distance targets, moving targets, ranging, shooter/spotter communication, and combinations of all of those under time constraints.
Generally, these include everything a rifleman is likely to find in any "sniper", "tactical", or "field" rifle match. The typical platform is a bolt action rifle, though an auto-loader of sufficient accuracy and appropriate caliber can do the job with some trade-offs.
For our purposes, consider "long range" to reach to the load's trans-sonic boundary (the point at which the bullet slows to 15 to 20 percent faster than Mach 1). For example, with typical 308 loads and rifles, we are interested in ranges from 25 yards out to about 700-1100 yards, depending on ambient conditions and the particular load.
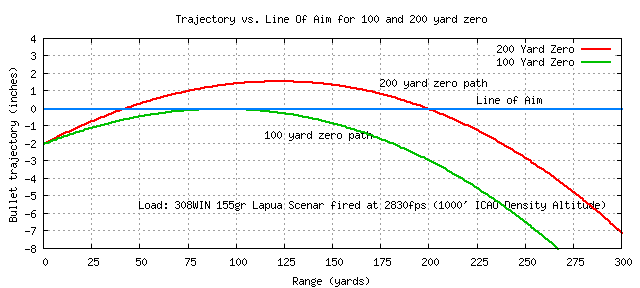
In the simplest case, take an accurate rifle with sights zeroed at 100 yards shooting one type of ammunition. In the absence of wind or shooter error, the bullet will impact the point of aim (POA) when the target distance is 100 yards-- hence its "zero" is at 100 yards.
The "line of aim" is a line straight from the shooter's eye, through the sighting device, to the target. The bullet starts off below the LOA by the distance between the center of the sighting device and the center of the bore. This is called the "sight over bore" distance. The axis of the bore is not parallel to the LOA-- the bore is angled slightly upwards. This causes the bullet to start off with some "upward" velocity. As it flies down-range, it rises to meet the point of aim (POA) which is where the LOA intersects with the target.
Depending on the bullet's velocity, the bullet might keep rising above the LOA and again intersect
with it a second time as it falls. Alternatively, it may rise just enough to meet the LOA and then
start to fall again.

In this graph, two loads are displayed. The green trajectory is a 308 load zeroed at 100 yards. It
starts 2" low, rises to the LOA at 100 yards, and then drops off the graph 8" low at 267 yards.
The red trajectory is the same load zeroed at 200 yards. It starts 2" low, intersects with the LOA the first time at about 40 yards. At 120 yards, it's about 1.6" above the LOA, then drops, intersecting the LOA again at 200 yards. This is the second, or primary, zero. At 300 yards, it's about 7" low.
Looking at the graph with the 200 yard zero, the point of impact (POI) at 100 yards would be about 1.6" above the point of aim (POA). At 240, the POI will be 2" below the POA. At 300, the POI will be 7.5" below the POA. Thus, to hit a small target at 300 yards, the shooter would have to hold 7" above the target. The bullet continues to fall relative to the line of aim as target range is increased.
A table can be constructed which relates the drop distance for every range out to the maximum engagement range. An abbreviated table might look like this, for a rifle with a 100 yard zero. (An actual table would have intermediate distances like 120, 140, etc.)
RANGE DROP 100 0" 200 2.87" 300 11.2" 400 25.6" 500 46.9" 600 76.0" 700 114.9" 800 161.7"This is helpful, but the shooter is left with the problem of how to aim 47" higher than the target when the distance is 500 yards. There won't be a 47" yardstick sticking out above the target. Aiming the cross-hairs at a point imagined to be 47" above the target is difficult and very error prone.
There are two units of angular measurement commonly used in rifle scopes. The first is the "minute of angle." Dividing a circle into 360 degrees, then each degree contains 60 minutes. One MOA demarcates 1.0472" per 100 yards of distance.
The second is the "mil". One mil is one part transverse per 1000 parts distance. In units we understand, 1 mil is 3.6" per 100 yards (ie, 100 yards is 3600", one thousandth of which is 3.6"). Consequently it's also 1 yard at 1000 yards. Alternatively, in metric, 1 mil is 10cm per 100 meters, or 1m at 1000 meters.

RANGE DRIFT for 10mph cross 100 0.6" 200 2.6" 300 6.0" 400 11.0" 500 17.8" 600 26.5" 700 37.5" 800 50.9"
Both the "drift" and "drop" values in the tables can be translated to use angular measurements (MOA or mils) instead of linear measurements (inches or cm) to aid utility.
155 LAP: 2825fps 100yd 0' RANGE elev wind 4mph->(MOA) 25 4.00 0.25 6 moa 50 0.75 0.25 6 moa 75 0.00 0.50 6 moa 100 0.00 0.50 6 moa 125 0.25 0.75 6 moa 150 0.50 1.00 6 moa 175 1.00 1.00 6 moa 200 1.50 1.25 7 moa 225 2.00 1.50 7 moa 250 2.50 1.50 7 moa 275 3.00 1.75 7 moa 300 3.75 2.00 7 moa 325 4.25 2.00 7 moa 350 5.00 2.25 7 moa 375 5.75 2.50 7 moa 400 6.50 2.50 7 moa 425 7.25 2.75 7 moa 450 8.00 3.00 7 moa 475 8.75 3.25 7 moa 500 9.50 3.50 7 moa 525 10.25 3.50 7 moa 550 11.25 3.75 7 moa 575 12.00 4.00 7 moa 600 13.00 4.25 8 moa 625 13.75 4.50 8 moa 650 14.75 4.75 8 moa 675 15.75 5.00 8 moa 700 16.75 5.00 8 moa 725 17.75 5.25 8 moa 750 18.75 5.50 8 moa 775 20.00 5.75 8 moa 800 21.00 6.00 8 moaColumns:
1. Range
2. elevation for #1's target distance, in MOA
3. wind for #1's target distance, in MOA
4. lead for #1's target distance, in MOA for a target traveling at 4mph (a medium walking pace)
All the trajectory values can be calculated using one of the modern small-arms ballistics calculator programs, such as Sierra Ballistic Explorer, Exbal, QuickTarget, Agtrans, etc. Several parameters are critical to their accuracy: (1) bullet ballistic coefficient (BC) values, (2) accurate measured muzzle velocity from a chronograph, (3) solid zero distance, and (4) accurate environmental conditions including station pressure, temperature, or density altitude.
Want a set of cards from DEMIGOD LLC? Click here

The following graph show the same trajectories, but with the bullet path converted to Minutes of
Angle (MOA) above Line of Aim. Observe that the MOA difference between the lines is constant as
distance is increased (the lines are "parallel"). This means that regardless of the zero distance
dialed, there is the same angular difference between any two zero distances (e.g. 400 vs. 600 is
approx 6 MOA.

There is one drop curve for a certain load (when the drop data is converted to angular units)
and that that curve is merely translated up and down by dialing the elevation knob.
- Precisely specify drop hold-over out to our maximum engagement distance.
- Precisely specify wind drift out to our maximum engagement distance.
- Precisely specify target lead for moving targets/shooter.
- Range targets of known size when Laser Range-finders are not appropriate
- Observe target area
- Retain #1-5's capabilities in low light conditions
A second focal plane (SFP) reticle demarcates angular distance that depends on the scope magnification setting. The reticle appears to stay constant as the target area shrinks and grows as the magnification is adjusted.
A fixed power optic is FFP by definition.
Knobs: If the primary method of specifying elevation is by external knob, the knob will have "click" values. Each time the knob "clicks" to the next setting, the elevation setting will be changed by the click amount. Typical values of clicks are 1/4 MOA, 1/2 MOA, 1 MOA, or 0.1MIL.
If the rifle and mounts are level, the elevation adjustment should be in the middle of its total travel when zeroed. For example, if we start with "0" at the bottom, a scope with 60 total MOA elevation will likely be zeroed at about 30 MOA up from bottom, and cranking it all the way up, it would stop at 60 MOA. In this case, the scope is limited to 30 MOA "up" elevation from center/zero. This will limit the maximum engagement range by limiting the elevation setting that can be dialed. For example, if a certain 308 load needs 31.5 MOA elevation for 1000 yards, the described scope will not be able to dial enough elevation. When it hits its maximum at 60 (30 above center/zero), it will still be 1.5 MOA "short."
The way to get around this is to use an inclined scope base. An inclined scope based has some downward "slope" built in. An inclined base with 20 MOA angle will shift the zero point in the scope further away from its top extent. For example, with the 60 MOA scope described before, instead of being zeroed around +30 MOA (its center), it would be zeroed at about 30 - 20 = 10 MOA up from bottom, and have about 30 + 20 = 50 MOA "up" elevation left. Now instead of running out of elevation travel trying to dial 31.5 MOA, the scope will dial freely up another 50 MOA-- when it is dialed to 31.5, it still has 18.5 MOA left for dialing to longer distances.
Nightforce 3.5-15x50mm NPR2 with multi-turn, 10MOA, 0.25MOA click knobs, on an AI-AWM rifle. Photo by Frankie Icenogle used with permission.
For example, if we have a scope with 1 MOA clicks, at 400 yards that will demarcate 4.2", so it will not be possible to dial the correct elevation to hit a 3" target at 400 yards with this setup. One adjustment setting might be just under the target, and the next would be 1" high over the top of the target.
The tradeoff of fine clicks is that more of them are required to achieve the same elevation adjustment. For example, if 15 MOA are required to get to 600 yards, that would be 60 1/4-MOA clicks, but only 15 1-MOA clicks. The large, coarse click values can be faster to adjust in the field, at the expense of fine-grained adjustment ability.
A scope without a zero-stop, like the pictured Leupold, has a knob that will keep turning until the erector assembly bottoms out in the scope body tube. Each revolution the knob turns move the knob up or down, just like a jar lid. On a scope without a zero-stop, the shooter typically notes which "hash mark" the zero-revolution corresponds to.
Leupold MK4 M3 scope on a Remington 700. Photo by Frankie Icenogle used with permission.
Some scopes are designed to have very many small clicks in only one revolution. A good example of this would be the US Optics EREK knob, which has 90 clicks per revolution and can be ordered with 0.25, 0.5, or 0.1MIL click values, which would yield 22.5MOA, 45MOA, or 9.0MIL travel per revolution.
Likewise, some scopes are designed to have just two turns of travel, with some indication to the user which revolution the knob is on. The best example is the Schmidt & Bender "Two Turn" PMII scope, which has approximately 27 mils of travel in two revolutions. Even the two-turn scopes have enough travel in the first revolution to shoot to 1000 yards with 308WIN.
Schmidt & Bender "Two Turn" PMII mounted on an AR10. Photo by Frankie Icenogle used with permission.
A BDC knob is nothing more than a regular knob with markings that correspond to the load used.
The erector's movement within the scope body is limited by the side of the main tube diameter of the scope. Thus the larger the scope tube diameter, the more elevation travel will be mechanically possible. (It is also possible that the elevation knob mechanism itself limits travel before the mechanical limit of the erector. This is most common in "one turn" scopes like the Leupold M3.)
Scope tube diameters include: 1" (25.4mm), 30mm, 34mm (Schmidt & Bender), 35mm (US Optics), and 40mm. The advantages of the larger tube diameters are more elevation travel available and a stronger scope. The disadvantage of larger tube diameters is that the selection of scope rings is few, however, there are several high-quality ring sets available for 34 and 35mm tubes.
Just like the "click" sizes, the spacing of the hash marks for reticle holdover in part determine the smallest engage-able target size. For example, if a reticle has 1 MIL demarcations (ie, in a mildot reticle) and you need to shoot a 10" square target at 600 yards, you need to hold approximately 3.4 mils high, so you'd put the target approx 40% of the way from the 3rd to the 4th mark. If the target is small, there is no precise sight picture-- you're holding "in space" again.
A more sophisticated reticle designed specifically for reticle-based holdover (and windage) is the Horus. The Horus H25 reticle is mil-based, with small tick marks every 0.2mil. A 308 shooter with the H25 reticle can shoot to 1000 yards using the reticle only.
For example, at the TACPRO 2005 sniper match, there was a stage in which 5 targets had to be ranged and engaged with one shot each under a strict time limit. I ranged the targets with my laser and wrote their distances on my note-pad. As I moved from target to target, I only needed to look up the drop for that distance and use hold-over in the Horus H25 reticle. I didn't have to fiddle with any knobs. This demonstrates the speed advantage of reticle-based holdover. A shooter should try to memorize his drop values, and it also helps if he can remember the current target distances or have a spotter to communicate them.
Engaging multiple targets with the Horus reticle at TACPRO 2005. Photo by Frankie Icenogle used with permission.
Reticle and hybrid holdover has the advantage of being much faster than dialing elevation changes between shots at targets of different range. The downside is that sight picture precision is reduced because of the larger granularity of reticle features vs. typical knob click values.
Again at the 2005 TACPRO sniper match, on a stage where I knew the distances beforehand (325, 375, 500), I dialed to 375, and noted the hold-under for 325 (0.4mil), and the holdover (1.1mil). While shooting the stage, I merely used the appropriate hold-under/over points in the reticle.
The FFP comes into play because with a wide range variable scope (my SN3 is 3.2-17x), dialing down the power will widen the field of view. Target to target transition times are drastically improved by widening the field of view. The ability to locate targets is enhanced by a wider field of view. To use reticle based holdover without the need to adjust to a specific magnification setting, the scope must have a FFP reticle.
Another advantage of the FFP is that ranging and miss-spotting can be done at any power and yield direct accurate results.
Exit pupil size numbers increase as the scope magnification is dialed down. That's the math behind the observation that a scope at a lower power will produce a brighter image than the same scope dialed up in power. During the day it doesn't make a difference. During the night, it makes a big difference in target ID and sight picture. For an illuminated reticle to be useful, its features need to demarcate the same at whatever magnification is needed for low light.
A FFP reticle setup allows reticle-based and hybrid reticle/click holdover to be used at any magnification setting.
There are some disadvantages to a FFP reticle in certain situations. As the magnification is increased, the width of the lines which comprise the reticle increase in apparent size and will obscure more of the target than the fine lines in a SFP reticle. Conversely, when the magnification is set near the bottom, for example at 4x on a 3.2-17x optic, the reticle lines "shrink" in size along with the target image and may become difficult or impossible to see in some lighting conditions due to their very fine width.
Because wind changes can be very dynamic, using the reticle for windage hold-off can be more effective than dialing wind. For example, by the time you notice the wind and dial a correction, it may have changed already. Using reticle windage hold-off can be immediate.
The adjustable objective is optically simpler, meaning fewer lenses and more clarity and brightness, but the shooter must reach forward to the objective to adjust it. The rotating knob adjustment is more convenient since it's located closer, near the rest of the turrets, however, more lenses are involved which can reduce clarity and brightness.
In either case, some parallax adjustment knobs or objectives are marked for range so the shooter can dial it based on the target distance. Others are not marked with distances, and it's up to the shooter to determine visually when the image is in focus and parallax-free.
To determine if parallax exists at a certain distance, the shooter aims at an object at that distance, then moves his head slightly side to side and up and down without moving the rifle. If the reticle aiming point stays "on" the object, then it is parallax-free. If the reticle aiming point moves with regard to the object, then some parallax error is present.
Some reticles are fully illuminated, but some reticles only illuminate their center portion. A fully lit reticle can be too "busy" visually, while a partially or center lit reticle might not illuminate all the reticle features. Brightness adjustment is critical. If the reticle is too dim, it might as well not be illuminated at all. If the reticle is too bright, it will wash out and obscure the target.
There are several methods to turn on or adjust the brightness. Leupold scopes have an on/off/brightness turret at the 10:30'o'clock position on the ocular housing, just to the rear of the power adjustment ring. This is offset from the elevation adjustment knob, but still obscures it somewhat. Nightforce scopes have a simple on/off switch activated by pulling put the cap of the parallax adjustment knob. Schmidt & Bender have an auxiliary knob on the side for on/off and brightness adjustment. US Optics scopes with illumination similarly have a auxiliary knob somewhere on the turret housing of the scope, location depending on other scope features.
Illuminated reticles, when turned on, are visible from the front of the weapon, through the objective lens as a red/orange light. The frontal visibility depends on the angle of observation, the intensity of the reticle, and scope design. If it is critical to not be observed from the target area, then reticle illumination must not be used.
A US Optics SN-3 with a 58mm objective lens. Photo by Frankie Icenogle used with permission.
The easiest way to increase brightness is to dial down the magnification on adjustable scopes. There is an inverse relationship between magnification and image brightness. This is another good reason to choose an adjustable magnification scope.
The second two factors affecting brightness are characteristics of the scope itself. Given two scopes with the same lens quality, the one with the larger objective lens will be brighter simply because it can focus more incoming light from the target area through the scope's lenses. Finally, lens and lens coating quality is critical to image brightness. Higher quality lenses and coatings will pass through more light and less brightness will be lost through the scope itself.
There is a trade-off to be made between objective size and mechanical considerations. A scope with a 80mm objective will gather 4x more light than a 40mm objective, but it will be much heavier and will require extremely high mounts to clear the objective bell over the barrel. Mechanical considerations favor the smaller objective, and a lower sight over bore distance is preferable since it reduces the mechanical offset.
- Variable magnification in the 3-18x range. Low power is useful in low light, on close targets, and on movers. Higher magnification helps for target ID and sight picture at long range. Scope must have parallax and focus adjustment.
- Knob "clicks" no more coarse than 0.5 MOA. The standard clicks of 0.25 MOA or 0.1 MIL are great. 0.1MIL is about 1/3 MOA. Clicks in this range are fine enough to allow precise specification of elevation for small targets.
- The elevation knob should have a zero-stop set up to allow either no clicks below "0" or up to a couple MOA "below" 0. The zero stop helps to prevent the shooter from being a full knob-turn revolution off from where he intends to be, and is easier to check settings in low light conditions.
- The reticle must be of a first focal plane configuration. The FFP reticle allows use of reticle features at any magnification setting, which is useful for target location, tracking of moving targets, fast engagements, spotting, and low-light.
- The reticle should have angular features in units useful for both hold-over/under and windage hold-off. Typical units would be 1/2 MOA hash marks, or 0.2 or 0.5 MIL hash marks. The Horus H25 reticle appears busy, but is ideal for rapid engagements of multiple targets at different distances.
- The angular units of the reticle features must match the angular units of the knobs' "click" values. There is no reason to have two different "systems" in use on the same scope. If the clicks are in MOA, the reticle features should be in MOA. If the reticle is in mils (e.g. Horus or Mil-dot), the knob clicks should be in mil units.
- Field-adjustable illuminated reticle. The illuminated reticle dramatically improves sight picture in some low light environments. The ability to adjust the brightness in the field is critical to prevent wash-out with a super bright reticle setting. The downside of an illuminated reticle is that it can indicate the presence of the shooter.
- Objective size. A good compromise point is a 44-50mm objective provided that the scope has very high quality lenses, such as those from Schmidt & Bender or US Optics. A larger objective size in a scope with lower quality lenses may be less bright than a smaller objective with high quality lenses.
- Schmidt & Bender PMII, 3-12, 4-16, or 5-25, again with matching angular units in the reticle and on the knobs
- US Optics SN-3 3.2-17x, preferrably with reticle features that match the knob clicks (mil/mil, or moa/moa)
- Leupold Mark 4 "FF". The M1 version of this scope has no zero stop. The M3 version of this scope has a zero stop, but coarse 1 MOA clicks. There is a new M2 version of this scope with 0.5 MOA elevation clicks which should be a good choice.
This comparison doesn't even include the cost of formal training, match fees and travel costs. If
you plan on shooting regularly to achieve a superior level of proficiency, it makes sense
to buy the best rifle and scope you possibly can.
-->
Proceed to PRACTICAL LONG RANGE
RIFLE SHOOTING - PART III: SHOOTING